
You unfold your Brompton only to discover it has a flat rear tyre. You can get yourself and your Brompton home easily enough (public transport, a lift from a friend or family, taxi, uber) but what then? If you don’t have the skills or confidence to change your rear tyre, are you simply going to leave it until you can get to your local dealer? What if that’s not within 24hrs? You might need your Brompton before you can get it fixed by someone else.
I dunno about you, but even a day without my Brompton is just not worth contemplating.
Learning how to remove and refit your rear wheel and adjust your hub gears may be daunting at first, but once you’ve done it successfully for yourself, it’s quite straight-forward.
Now before you scroll straight to the comments to tell me this; yes, I know Brompton have You Tube videos showing you exactly how to do this. If you haven’t viewed it yet, it’s worth having a look:
So why am I bothering with this post? Too much spare time? (That could be part of it.) But the main reason is I meet so may Brompton riders who claim they are not ‘mechanically minded’, yet they all acknowledge the value in at least knowing how to change a rear tyre should they ever have to. Although I find removing my rear tyre and adjusting the gears bothersome (because it generally means I’ve got a flat) it’s definitely not the feeling of dread or helplessness that it means for some.
This post is – hopefully – a slow walk-through of the steps required to take off your rear tyre, put it back on, and adjust your gears so they function properly.
NOTE: I am assuming you know how to check your tyre and patch your tube if you’ve got a flat. If not, watch this. Not everyone does it exactly the same way, but it’s a good one to follow if you don’t have prior experience. The Brompton toolkit comes with easy to use patches. Tucked away inside your frame, the toolkit will be there when you need it.
BEFORE YOU START
You will need a 15mm spanner. The one in the Brompton toolkit is very handy. If you’re at home you might have another one you prefer to use.
A clean rag or paper towel to place parts on. I always carry a few folded paper towels in my bag – very handy for putting parts on or, indeed, wiping your hands afterwards.
In the photos below I’m using a bicycle stand. If you don’t have one (or you’re out and about) I prefer to work on my Brompton like this, as opposed to upside-down and resting on the gear levers:

REMOVING THE WHEEL
Step 1: Completely deflate your tube (if it isn’t already completely flat)

-

- Yeah, it’s flat
Step 2: Make sure your hub gear is in third (i.e. highest gear using the right-hand gear lever)

When your hub gear is in third, the indicator chain should be slack like this:

Step 3: Loosen this lock nut just enough so that you can unscrew the barrel nut (tubular thing) above it.

Step 4: Don’t move the lock nut too much as it’ll be a guide for later. Completely unscrew the barrel nut, disconnecting the indicator chain (the bit I’m holding) from the gear cable as shown.
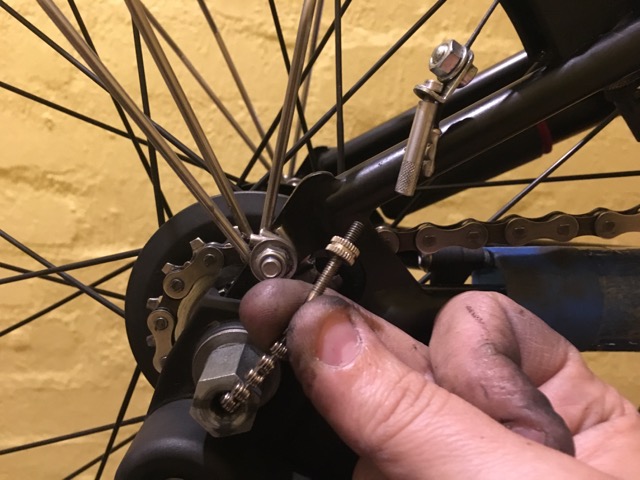
Step 5: Unscrew and remove the indicator chain from the hub and place somewhere clean. The end should be greasy, not dry – do not wipe it clean. Try to keep it clean as you don’t want to introduce anything (dirt, grit, water etc) into the hub.


Tip: If the grease on the end of your indicator chain appears dry (assess this without touching it), take your Brompton into your local dealer to have a look at your next opportunity.
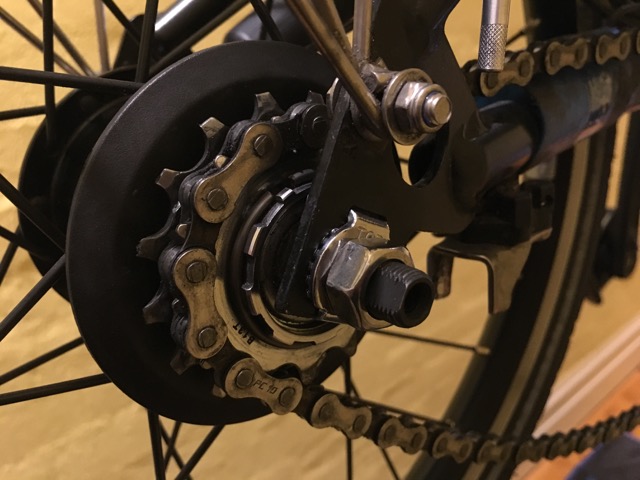
Step 6: Remove the nut (15mm spanner) while holding the chain tensioner (the black thing with the moving arm) in place. Do NOT lose the washer. (I’ve done that. Your Brompton will not work without it.) Put the washer and the nut on your clean rag / paper towel.

Step 7: Firmly hold chain tensioner in both hands and gently disengage the chain tensioner from the frame and the chain (you might need to wiggle it a little). Be prepared for the long arm of the chain tensioner to spring back – the internal spring is quite strong. You don’t want to lose your grip and have it fly up into your face.
[No picture because I’m using both hands to remove the chain tensioner]
Step 8: Loosen and remove (on each side) the 15mm nuts that hold the rear wheel on your bike.
Step 9: If the washer unhooks while you’re taking off the nut (see right photo), just slip it back into place until you’re ready to remove the wheel. The washer in the left photo is still in place.


Step 10: To loosen the washers, jiggle or bump the wheel gently from underneath.

Because your tyre is completely flat, the wheel should just slip out from between the brake pads and from the forks once the washers have been released. If you have a new tyre, or a Marathon/Marathon Plus tyre, you may need to pinch the tyre near the brake calipers to squeeze the tyre gently past the brake pads.
Disengage the chain from the sprockets and your wheel is free. If the chain wants to ‘stick’ to the sprocket (and you’re not twisting it) you should give your chain a clean and lubrication when you’re done with the rear wheel.
These are the parts on my clean rag/paper towel once the wheel has been removed:

REFITTING THE WHEEL & ADJUSTING YOUR GEARS
Step 11: Repeat Steps 8 to 10 in reverse order to refit the wheel to your rear triangle/forks. The nuts should be tightened very firmly – you don’t want your wheel coming off, but at the same time you want to be able to undo those nuts again should you need to.
Step 12: Inflate your tyre and put the valve cap back on. Now is a great time to do this especially if you’ve just repaired a puncture; occasionally a patch doesn’t hold and it’s better to find out now, not after you’ve put everything back together again!
Step 13: Your first time re-fitting the chain tensioner can be an interesting experience; just remember that the axle goes through the round hole in the chain tensioner:

Which means that long arms needs to be turned around to point in the same direction as the short arm. Use two hands to get it in position as the internal spring is quite strong. Then follow the next six photos as captioned below:
-

- 1. Turn the long arm on the chain tensioner to face the same direction as the short arm (you might need both hands)
-

- 2. Holding it firmly, position the rollers so that the roller of the long arm is on top of the chain, the roller on the short arm is below the chain
-

- 3. Rotate clockwise and lift the chain tensioner back into place
-

- 4. Make sure the roller on the short arm is sitting properly in the derailleur
-

- 5. Once the rollers are in place, fit the end over the axle and onto the rear triangle/fork
-

- 6. It should feel secure if it’s properly in place
Step 14: Replace the remaining washer and nut which hold the chain tensioner in place. You may have to lift the washer slightly to help it centre around the nut properly before tightening the nut with a 15mm spanner. Don’t over tighten – this nut is simply holding the chain tensioner in place and does not need the same amount of tightening as, for example, the nuts holding the wheels on do.

Once secured, try gently turning the pedals to make sure the chain moves freely in both directions before moving on to the next step.
Step 15: Guide the indicator chain into the hub through the nut and twist (to the right) until fully re-threaded into the hub.

Loosen/unwind the indicator chain by half a turn (180 degrees) and ensure the chain links are positioned to easily bend up towards the gear cable. Also check that the chain is moving over a flat surface – I’ll loosen the nut just slightly in the picture below to achieve this:-

Step 16: Screw the barrel nut back onto the indicator chain

If the two parts won’t reach, check which gear you’re in. You need to be in third (hub) gear. To demonstrate, the photo below was taken in first gear – clearly the two parts aren’t going to connect:-
Step 17: Tighten the barrel nut to roughly where the lock nut is. (Don’t get too excited and tighten the lock nut yet.)

Step 18: Change to SECOND hub gear

Step 19: Use a torch (phone, front bike light) to check how far the rod part of the indicator chain is sticking out. Brompton’s Technical Guide say you should see 1mm of rod when you’re in 2nd gear. In my photo I’m a little over 1mm so I need to loosen the barrel nut slightly.

 Screenshot from Brompton’s Technical Guide showing the adjustment of the indicator chain in second gear for proper gear adjustment
Step 20: Adjust the barrel nut until the indicator chain is correctly tensioned.

Step 21: Once I’m happy it’s right, I’ll tighten the lock nut (use two hands to make sure the barrel nut doesn’t move). I only ever make this finger-tight, but I do it up as tight as I can with just my fingers. I never use pliers or any other tool to tighten the lock nut as I may not have tools available when I need to loosen it.

Step 22: While your Brompton is on the stand (or resting on it’s back), test all the gears (including the derailleur) to make sure they’re working smoothly.
Step 23: Take it for a test ride. Even when using my bike maintenance stand, no matter how well I think I’ve put it back the way it was, I never get it quite right. When I’m out on the street and need to adjust my gears, I find putting my Brompton into the ‘parked’ position makes is the most convenient and stable way to go about this task.


So if you’ve followed all the steps above but those gears aren’t quite working correctly, here’s how to troubleshoot adjusting your hub gears…
TROUBLESHOOTING
- Double check that you can see 1mm of rod (using the peep-hole of the nut that your indicator chain slides through) whilst your Brompton is in second gear (refer back to Step 18).
- Remember how the indicator chain looks in each of the three gears:
-> Tight in first gear
-> Some play in second gear
-> Loose in third gear
Therefore:
If you’re having trouble moving down gears, you should tighten your indicator chain, and
If there’s a lag when changing up gears, you should loosen you indicator chain. - Make sure you’re in third gear before trying to adjust your indicator chain, or there will be too much tension on the indicator chain to allow you to do this properly.
Keep in mind that you may only need to turn the barrel nut on the indicator chain only half, or even a quarter or a turn to achieve the desired result. If you find you’re not able to get into ether first or third gear at all, you will need to tighten/loosen the barrel nut a whole turn (or perhaps two) before fine-tuning it.
: )

Reblogged this on MNL Moves.
LikeLike
Thanks a lot for your detailed explanation! I’m new to (seriously) taking care of a biycle and there aren’t any maintenance workshops near by. Couldn’t have fixed my brompton so quickly without this. 🙂
LikeLiked by 1 person
Hey @brommi,
Glad you found it helpful 😀
Cheers!
LikeLike
Great and very helpful – but only found it after I hit trouble
In step 16, you show how the indiocator chain is not long enough to connect to the barrel adjuster if the internal gear is not in gear 3
It seems that is where I am stuck
Because I cannot change gear until I have connected it and I can’t connect it!
At least I think that is my problem
Can you suggest a way out please
LikeLiked by 1 person
Hi Bruce,
Check that your cable outer/housing hasn’t come out of your shifter or your cable pulley (the black blocky thing on the rear triangle).
That’s usually the cause. LMK if not.
LikeLike
This is a super clear guide: many thanks!
LikeLiked by 1 person
You saved my day m8!
LikeLiked by 1 person
A great help, thanks!
Regarding the tensioner, the win for me was remembering that the short arm goes *on top of* the chain when the bike’s upside-down, as it will be when you’re doing this in the wild. The long arm just loops through so it’s *under* it, pushing up.
Worth checking that runs smoothly before you screw the chain in, you can even use the left-hand shifter to be sure.
LikeLike
Glad you found this post helpful 🙂
It’s not needful to turn your Brompton upside down… just park the bike and, if you’re removing the rear wheel, tilt back the saddle to rest on the ground. No dirty grips or saddle, and the easiest way to disengage (or re fit) your chain from/to the chain tensioner. 🙂
LikeLike